Thursday 27 June 2013

Expression Nail Art


Nail arts are not just meant to color your nails in a distinct manner. They are also meant to state a cool attitude and make a striking style statement with the design. Designs with shapes and curves have run their course. It is now time for you to move on to a different trend. Something new which will not just beautify your nail art, but also will make it convey a feeling!!!

An urge for new designs is like a strong fever which has a tight grip on fashion since ages. From simple shapes to curves, curves to flowers, flowers to animals, the list of ideas for designs will never end. When you have an occasion to attend, you can’t afford to waste time working your brains out for a new design… can you? It’s not always compulsory to have a predefined or familiar design for nail arts. There is always a room for new thoughts!!!

Why not try an expression on your nails?


For those who crave for something new, the Expression Nail Art is here!!! With this nail art, each of your nail shows up with a different emotion!!!   

Procedure to apply this art:

1. Cover the tip of each of your nails with a different color. You can choose any color but a glowing color is preferred.


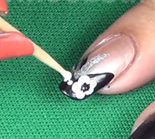
2. Make black dots to show the eyes and a black line at the base of the tip showing the mouth. To add a smile draw curves at both the ends of the mouth. This creates first expression on your nail.


3. Similarly for the other nails, make eyes and mouth in a different style to show different expressions like anger, happiness, sorrow, tired or any other you can think of. This part needs a little creativity.


4. After the designs are completely dry, apply a top coat to add extra shine and gloss. It will save your design and shield it from external disturbance.


Video Tutorial:


Finish all of this and you’re done with the Expression Nail Art!!! All of your nails expressing a feeling!!! Try this smart nail art and let your nails speak for you!!!     

Monday 24 June 2013

Easy Funky Nail Art


Nail arts are quite an easy way to flaunt a new look, but applying the most creative and tricky nail art is not that easy for mane people, is it? You need both patience and precision to make a perfect design which best matches your outfit for the occasion. Apart from this, your design needs appropriate level of maintenance so that it doesn’t get spoilt.

Designs like simple shapes, funny faces and zip-shape are quite easy for a nail art, but when it comes to designs like sponge bob characters and leopard print, you take some time before you make up your mind. Once you start doing it, you keep worrying if you will be able to finish it… right? You may even mess it up out of anxiety!!!


For any occasion, choose that design which you feel you can do best!!! This will maintain the beauty of your nails and at the same time, portray your sense of perfection.

Exclusively for the ladies who prefer the combo of style and speed, the new Easy Funky Nail Art!!! This nail art is a quick and simple way of nail grooming.   
  
Procedure to apply this art:

1. Cover alternate nails with basecoat of black color and pearl sheen color. Let it dry.


2. On the top of the nail having pearl sheen base coat, draw a black V-shape. 


3. On the V-shape, draw adjacent white dots using a toothpick to make the shape of a flower.


4. Put a small dot at the center of the flower and draw strokes starting from the same point outside the flower-shape. Put dots on both sides of the flower.


5. Cover the nail having black basecoat with white color making an oval shape slightly towards the side.


6. Within the white shape, draw C-shaped curves so that they form the shape of a flower. Make white dots just below the base of the oval shape.  Make similar designs on alternate nails.


Video Tutorial


Hardly a few minutes and you’re ready with the Easy Nail Art!!! This nail art is really easy to do as the name suggests. Try it and see how quickly the look of your nails changes from ordinary to outstanding!!! 


Saturday 15 June 2013

Mehndi Nail Art


Your hands hold great beauty!!! You like to decorate them the way you want for every occasion.....!!!

 The style of decoration varies with the occasion and the fashion as well. When you’re going for a party, you prefer a gold or silver bracelet for a more glamorous look. For a casual look you wear a stylish wooden bangle. A set of traditional bangles suit you best when you’re attending a family function.

This way your hands flaunt a different look for different situations. One of those situations is marriage. Be it your wedding or that of a friend or relative of yours, mehndi is one of the most important parts of your appearance. You have a wide variety of designs to choose from. Design happens to be something you’re very choosy about. You want your mehndi to show up a new design and at the same time the design shouldn’t look worse. 

What if your nails gave the same blissful look with the mehndi art on your hands?


Make your nails look more gorgeous with the new Mehndi Nail Art!!! It blends in with the beautiful design of your mehndi. Make your nail art match your hands!!!

Procedure to apply this nail art:

Cover your nails with a pink base coat. You can pick any other color of your choice if you want. Let it dry. Then draw curves and loops starting from a corner of the nail and then cover the nail entirely with a design similar to that in a mehndi. Design can be of your choice.

After the design is completely dry, use silver color paint to fill the loops in the design. This will give your nails a dazzling look.

Style up your design using stones or seroski stickers. You can stick them preferably at the bottom of the design to add a pinch of glamour.

After the designs are finalized and dry, apply a transparent coat on your nails to save the design. This coat will keep your nail art externally shielded.

Have a look at this video:


Now you have your Mehndi Nail art ready. Just like an illusion, isn’t it? This nail art not only suits wedding occasion but also other occasions which involve a traditional dress code. Try this out and see how your nail art disappears into your mehndi design!!!


Monday 10 June 2013

Stamping Nail Art with Heart


Changing nail art every now and then has become an essential part of our fashion. We just can’t resist the temptation of trying another nail art, no matter what it takes. For those of us who love and live fashion, nail art is a killer weapon to set the trend. 

Stamping nail art is something that will give you a breather. When trying new designs for your nails, have you ever thought about something that gives you a lot of choices, that too with great ease? Stamping is one such thing that gives you a variety of designs and patterns to choose from and it is not at all time consuming. In fact, it makes designing new nail arts like child’s play and is amazingly fast. Stamping kit is the only weapon you need to win the style battle.


nail art designs
Heart Stamping Nail Art


Follow the simple instructions to apply this ultra stylish and modern design. Before you start, you need to have the Konad stamping kit and polish ready before starting the design.

First of all, apply the base coat on your nails. Use blue polish for the base coat.  You can also try any other bright colour.

Choose your favourite design from the image plate. Put nail paint over the design on the image plate. Use Konad special nail paint- white colour for this. The coat should be very thick. Now, scrape off the extra paint using the scraper. 

It should be done in a way that the paint remains on the pattern only. Angle the scraper at 45 degree for perfect pull.

Now, roll the stamp over the design on the image plate. Make sure to press it gently so as to get the design imprint on the stamp.

Now align the stamp with the edge of your nail and press the stamp against your nail in a rolling motion. Now when this is done, you have the design gets imprinted on your nail.

It’s time to make the design more glamorous. To do this, you can simply add black dots to the design. Take red polish and create some beautiful little hearts on the nail as shown in the pic. You just need to draw V shapes to create the hearts.

Cover the base of the heart using silver polish. Make silver dots at the base. This gives the design a very rich and classy touch.

Watch this video:

Stamping Nail Art With Heart - Do it Yourself


This style goes perfectly with every occasion. Flaunt these chic and lovely designs wherever you go and raise some brows!

Honey Comb Black Nail Art


Nail arts generally involve steps applying a base coat, making some design either with hand or by stamping and finally accentuating the pattern with stones, stickers and studs. Whatever you do, your nail gets completely covered in any nail art. It’s wise to keep your nails beautiful with nail art, especially if the shape of the nails is not that impressive.


Some ladies are gifted with very pretty hands having naturally soft skin, fingers neither too long nor too short and a highly attractive shape of nails. For them, nail art is not necessary required. But when you are changing every part of your appearance for a particular occasion, it will look odd if you leave your nails apart.

Now comes a point, where you have to choose between style and simplicity. Covering your nails completely with nail art and hiding their natural look or leaving them blank can be the odd one out!!!

To ease this situation, you need a nail art which does not overshadow the natural beauty of your nails and at the same time gives them a polished and modish look.

Presenting the new Honey Comb Black Nail Art!!! This nail art is one of the easiest ones to apply. It adds extra gloss to the natural look of the nails and at the same time adds an impressive texture to the tips.

Procedure to apply this art:

1. Using a transparent tape, cover your nails in such a way that only the area meant for the French tip stays open. Cover the French tip using black nail paint. Do the same on other nails.

nail art designs
STEP 1


2. After the paint dries, carefully take off the tape and cover the left out portion of the nail with a coat of transparent paint.

nail art designs
STEP 2


3. For the honey comb look, add hexagonal sequence to the French tips.

nail art designs
STEP 3


With this nail art, only the French tips are covered with hexagonal pattern.The remaining part of the nail remains the same, allowing you to sport the same original look with added shine and an enchanting design on the tips. Try this and show the inborn beauty of your nails with a touch of style!!!

Tuesday 4 June 2013

Red and white bow nail art!!!


A fascinating design and a charming color combination is what you look for in a nail art!!!

The initial phase of nail arts popularized the fashion of having simple designs like face of a panda and some ordinary shapes in multiple colors on the nails. Though not very appealing, these designs proved to be a turning point in nail grooming fashion.

As the popularity of this technique grew, cartoon faces like those of sponge bob characters and some funny face designs began to be a part of nail arts. These designs   portray your liking for cartoons when you use them in your nail art.

Developing more and more in a progressively, this technique has further introduced designs like flowers and many other curvy shapes. The growth of this art in fashion has now gone to such an extent that you can now flaunt the look of the night sky with twinkling stars, on your nails.
Following this, came some funky nail arts with designs like zip and canvas shoes.

nail art designs
Nail Art


Leave all that behind and move on now!!!
Presenting the new Red and White Bow nail art for those who’re not nostalgic regarding designs!!! A bow adds to the charm of your party looks. Now fashion your nails with the same look!!!


Procedure to apply this nail art:

Apply a red base coat or a base coat of any other color of your choice. Take the Konad Stamping Nail Art image plate having the bow design. Put some white nail paint on the plate and swipe it with a scrapper so that the color spreads evenly.

Now press the image plate at white colored area with a stamp so that the design sticks to it. Then diagonally place the stamp on your nail and lightly press it so that you can get a neat bow design on your nail. Do the same to the other nails.

Use a cotton bud dipped in a nail polish remover to wipe off the extra color. You can add rhinestones for a more majestic look. Place them as you want.

Wait till the designs dry completely. Then add a transparent coat to save your design. This will keep the nail art protected from dirt. It also gives your nails a glossy look.

Video tutorial:


This completes your Red and White Bow Nail Art. With this trick you can make a stunning style statement with any outfit.    

Monday 3 June 2013

Sunny and Cloudy Day Nail Art


It gives unexplainable joy when the cool breeze of the morning touches your face at the very moment when you’re looking at the rising sun, doesn’t it? Nature has given us enough to relish, and we keep looking for material satisfaction and pleasure of having a lot of money. Did it ever occur to you why morning is the best time for physical exercise and meditation?

The beauty of nature shows up in various forms, be it the rainbow or the lightning in the night, or simply the blissful look of the shining sun. This makes people choose colors and designs similar to that of the sun, moon and clouds. You too sometimes wear t-shirts with such shapes. Your nail grooming now can make you flaunt a style with the beautiful features of nature. 


Sunny & cloudy Nail Art


For the nature-loving and fashion crazy women, here’s the new Sunny and Cloudy Nail Art!!! Now add the charming features of the nature to the look of your nails and make a difference wherever you go!

Procedure to apply this art:

1. Keep the skin areas surrounding your nail covered using a cello tape so that color does not come in touch with the skin.


2. Put some blue nail paint and sky blue nail paint just below it, on a sponge.


3. Then dab the sponge gently on your nail in such a manner that the colors gets transferred to your nail. Wait for it to dry and then cover it with a transparent shimmer coat to give a gradient look.


4. With yellow nail paint, draw the shape of a shining sun on the corner of the nail. Make the eyes and mouth using black nail paint. Make white clouds on your nail at randomly spaced spots. Do the same on the other nails. Wait for them to dry.


Watch this video: 


Do all this and the Sunny and Cloudy Nail Art is ready!!! Just a matter of time before you groom you nails with an enticing design depicting the bliss of the nature!!! Sun and clouds on your nails!!! Quite exciting, isn’t it? Go try it and make an impressive style statement!!!